Roasted Veggie Pesto Pasta

Since I started selling at Farmer’s Market in Minneapolis, my favorite part besides seeing people enjoy my waffles has been meeting the amazing other vendors. I recently met the wonderful pair behind Dumpling & Strand. It’s a homemade noodle company making small batch authentic noodles using the freshest ingredients.

I couldn’t resist buying some of their gluten-free variety. I opted for the Fusillo, but they had about 5 different varieties of just gluten-free!! That’s insane. They came with about 18 different kinds of noodles and ramen that day too. I was in awe. One of the owner’s happens to also be a food scientist, so I had a great time picking his brain when it comes to dough, of the waffle kind.

I’m on a pesto kick lately, so obviously I went with a simple pesto with roasted veggie for my noodle dish. I can tell you it was simply divine!

Roasted Veggie Pesto Pasta (gluten-free)

Cauliflower
Broccoli
Mushroom
1 Tbsp pesto (I used Trader Joe’s)
3 oz cooked pasta (I used Fusillo from Dumpling & Strand)

// Cook pasta in salted, boiling water one minute less than the package recommends.
Roast veggies at 400 degrees for 20-30 minutes with salt and pepper.
Heat pesto in pan and add veggies and cooked pasta and sauté until coated in pesto.
Add some pasta water to pan if pesto is too thick.
Shred some parmesan over it and dig in!!

IMG_6270


Baking hack (for butter)!!

I do A LOT of baking these days. With a waffle business and soon-to-be biscuit “company” I need plenty of hacks to get me through most days. I usually don’t plan that far ahead to put my ingredients out hours ahead of time. Since the #1 rule of baking is having all room temp ingredients (besides some pastries like biscuits that require cold butter) you NEED to have room temp butter.

You’re probably saying, “I just microwave it,” wellllll that may work if desperate, but nuking it results in a melted outside yet freezing cold inside to your butter. No bueno.

Well I’ve done the research for you know and I’ve discovered the trick to end all baking conundrums. “Steaming” the butter. Yes, steam results in even heating throughout the butter at a not so rapid pace as microwaving.

Next time you’re in the baking mood and need room temp butter, try this!

IMG_6175.JPG

So here’s the technique:
Get a glass cup that will fit the cold stick of butter.
Fill the glass with water and microwave until boiling (3-4min).
Remove from microwave (it’s hot!!) and pour out the water.
Put the stick of butter upright on the table and cover with the hot glass cup.
Let sit and “steam” for 10-15 min or until just softened.

**Also, if you needs room temp eggs… Put them in a bowl with hot water for a couple minutes.

Pupusas

I first discovered the mighty delicious pupusa on an unassuming corner of Southeast Minneapolis. It happened to be across from one of my favorite breakfast spots, original (tiny tiny) location, but I had never thought to look across the street to find one of my favorite South American dishes too.

The pupusa is basically a thick tortilla that is filled with meat, cheese or veggies, in my case. It’s then griddled to crispy yet pillowy-perfection. If you like corn tortillas then you’ll love this take on them. Growing up, my mom would make homemade corn tortillas anytime we had tacos, so I’m no stranger to the process of make the dough and pupusas are made the exact same way.

Pupusas take no longer to make then a putting together a bowl of cereal (as long as you have the fillings ready), and taste way better! No excuses not to make these tonight 😉

IMG_6047

Pupusas (recipe adapted from Yeah… Immaeatthat)

dough:
2 cups masa (fine corn flour)
1 1/2 cups luke warm water
large pinch of salt

// Mix dough until the texture is like play dough and not crumbly.
Add more or less water until the right texture.
Let dough sit for 10 minutes.

filling (try any combination):
chopped roasted veggies (broccoli, brussel sprouts, zucchini, cauliflower, peas)
cilantro
cheese (mozzarella, cotija, feta, goat, etc.)
cooked meat (shredded chicken, ground beef)

// take large chunk of dough and flatten it in the palm of your hand, then curve up, forming a well to add fillings.
Close the ball by pinching the dough together.
Flatten the ball of dough (with fillings inside) using the bottom of a plate or tortilla press until about 1/2 inch thick.
Griddle the pupusas in a lightly oiled pan 2-3 minutes each side.

IMG_6046


Waffle Wednesday

When you own a business selling liège waffles, it’s hard not to think about Wednesday as the most important day of the week. #WaffleWednesday is my life.

I’m kidding, but when it comes to social media it’s important to provide your followers with great content, often. With my lack of blog posts, it’s clear that I’m not quite following my own rules when it comes to this page. I really need to start focusing on new recipes and keeping my meals new and exciting for everyone.

But because it’s Wednesday I wanted to pop-over here for some updates on how my business is going. One word: INCREDIBLE.

I had no idea what was going to happen when I started a business at 22 years old, but I’m so passionate about what I’m doing that there’s no way I’ll let it fail. So many exciting things are in the cards for me and Tbsp.

I now have three farmer’s markets in Minneapolis under my belt.

IMG_7420-1.JPG

My older sister and twin helping me sell waffles!


IMG_7399.JPG


Screen Shot 2016-06-29 at 1.18.53 PM.png

Happy (waffle) Wednesday and if you live in Minneapolis, or anywhere in Minnesota, come meet me at a farmer’s market this summer and try a waffle 🙂

Thai Peanut Sauce (on everything!!)

Wow, I need to start eating something other than rice for dinner, so I can get some new recipes up in here!

Many people don’t know this (because it’s a closet addiction), but I have a horrible addiction to peanut butter. I don’t EVER allow myself to buy it because I will go through jars! in a week. The worst part wasn’t the insane amount of weight gain from eating 1,200 calories in peanut butter a day, it was how awful my stomach felt every second of the day.

Peanut butter is my drug of choice, used to be at least. Then I rediscovered PB2 (loved it in high school), and my live was complete again. I can eat the same insane quantity of PB2 but it’s only a fraction of the calories of regular PB. Win for my stomach too. I’m all about the healthy fats, but there’s a point when too much is detrimental to your gut.

I couldn’t give it up completely because what fun would that be? If I like PB I’m gonna eat it, but I needed to learn how to eat it in healthy quantities. Baby steps, peeps.

My new fave blog Yeah… Immaeatthat is a great proponent for eating what you want when you want and just living life without food barriers. I was stalking her blog one day and she posted a recipe for a peanut sauce. I happened to have all the ingredients so obviously I went home and whipped it up and topped my fave rice bowl. Boom. DELICIOUS!

IMG_5914

Thai Peanut Sauce (recipe adapted from this)

1/2 cup prepared PB2
2 Tbsp. rice wine vinegar
2 Tbsp. coconut aminos (soy sauce if not gluten free)
1 Tbsp. maple syrup (honey works if not vegan)
1 1/2 Tbsp. sesame oil

// Combine all ingredients in a bowl until smooth.
Drizzle over roasted veggies and rice, or even use as salad dressing!

IMG_5915


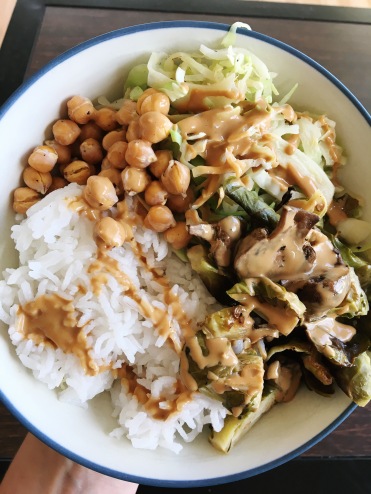
Rachel’s “Power” Bowl

I’m calling this my “Power” bowl because I’ve never felt so alive after eating a meal that I made in under 10 minutes (I had half of it prepped ahead). I felt soooo powerful 😉

As the weather gets warmer, I crave carbs less and less, so a dinner packed with perfectly cooked veggies and some meatless protein was just what I needed. I did have a couple corn tortillas on the side so that my energy doesn’t sink during my usual late night workout.

I’m also on a hot sauce kick (I used to hate ALL spice) so I’ve been adding Chalupa to most meals to give it a real punch, and I actually think it’s making me feel much more satisfied after the meal. Is that a thing, nutrition people? No more peanut butter spoon after dinner for me!

I used veggies and chickpeas I had roasted in my fridge along with some sautéed cabbage in this bowl, but use whatever floats your boat. If you like peppers and onions, use that. If you want sautéed spinach and broccoli with a side of sausage, have that. No rules for this one (as if there’s ever any rules in cooking – I used canned tuna for a taco…lol).

IMG_5876.JPG

Rachel’s “Power” Bowl

1 cup roasted brussel sprouts
1/2 cup roasted chickpeas
Big handful of cabbage
1 tsp chili powder
salt & pepper
A few dashes of Chalupa hot sauce (optional)

// Heat pan on medium high and add cabbage with chili powder.
Cook until tender.
Reheat cooked veggies and chickpeas in a dry pan or microwave.
Add all veggies and chickpeas/protein to a bowl and add the hot sauce.
Enjoy with a side of corn tortillas, or even some sticky rice.

Sesame Tuna Spring Rolls

When you’re starting a business (like me) you start to go into money saving mode, and I think it’s pretty clear where I’m cutting back on spending money. The protein department.

Canned tuna has been my food staple for the past few weeks, and I can’t say I mind after eating this spring roll recipe I came up with out of pure desperation. I needed a quick dinner I could pack and eat in the car on the way to the lake, and spring rolls are always a compact option that can be eaten cold or room temperature.

Ignore the awful pictures of the rolls because they tasted A LOT better than they looked, promise.

IMG_5782

It was a glorious weekend spent at my parents house in the lake country of Minnesota. There’s nothing like waking up and having nothing to do besides sit on the deck and drink a nice cup of coffee and eat some of my Liège waffles.

IMG_5771

Sesame Tuna Spring Rolls (gluten free)
Serves 1

3 pieces of rice paper
1 cup cooked rice, cooled (follow my recipe for sticky rice)
big handful cabbage
1 can tuna, drained
1 tsp mayo (homemade is best)
1 1/2 tsp sesame oil
1 tsp coconut aminos (soy sauce works if you eat gluten)
salt & pepper, to taste

// Saute cabbage in 1 tsp sesame oil and set aside to cool.
Mix tuna with mayo, sesame oil, coconut amino, salt & pepper.
Assemble rolls by soaking rice paper in warm water until pliable and adding 1/3 cooked rice to the bottom 1/3 of the paper.
Add tuna above the rice and cooled cabbage on top of rice and tuna.
Roll the rolls from the bottom and tuck sides in halfway through to ensure closure.
Eat chilled or room temp.

IMG_5770


Bowl of Veggies w/ Avocado Pesto

Who doesn’t love a big kale salad?…Well, ME! If it’s not massaged I don’t want it.

No joke, massaging kale is the only way to break down the coarse fibers in the kale making it almost creamy. Another way I’ll eat kale is when it’s doused in this avocado pesto I whipped up this weekend. It’s perfect for any veggies, or as a thick salad dressing like I did for this recipe.

Feel free to even dip tortillas chips in this pesto as it slightly resembles guacamole and may even taste better – if I don’t say so myself 😉

Even add it to a crudite platter and you’ve got a delicious veggie dip that anyone will love, unless they’re adverse to green foods…

I roasted up a couple pans of veggies and a can of chickpeas and added it to chopped kale and created the most delicious summer salad and it even works for leftovers, as the kale won’t wilt with the dressing on it.

IMG_5788.JPG

Veggie Bowl with Avocado Pesto (gluten free, paleo)

2 cups brussel sprouts, quartered
2 cups button mushrooms, quartered
1 large sweet potato, cubed
1 bunch dinosaur kale, chopped thinly
1 can chickpeas, drained and rinsed
2+ tbsp olive oil
salt & pepper

// Preheat oven to 425.
Add all the veggies and chickpeas, besides the kale, to a sheet pan with olive oil and salt and pepper.
Roast for 20-30 minutes or until tender and set aside to cool.

Avocado Pesto:
1 avocado
2 cloves garlic
zest and juice of 1 lime
1 small jalapeño
1/4 cup pine nuts
1/2 cup parsley
1/2 cup cilantro
1/2 cup olive oil
1/4 cup water
1 tsp cumin
salt & pepper

// Combine all ingredients and pulse in a food processor until smooth.
Add more water if it’s too thick.

Assembly:
Add kale to a large bowl and add enough dressing to generously coat the kale and mix thoroughly.
Add the rest of the ingredients and mix well, adding more dressing if needed.


Thirsty Thursday

Are you one of those people who has their signature cocktail that they always order at a bar? Well I’m not.

I wish I could be one of those raspy voice, scotch drinking women but it’s just not my thing (yet). I usually opt for something with gin or vodka of the tonic variety with LOTS of lime. Lame, I know!

Though if I’m at home with my own ingredients I do have the one drink I always make and I’ve made it my signature (at home at least). It’s a Whiskey Sour-esque drink, but at a bar they use sour soda which isn’t the same so no ordering for me. I love the fresh crisp-tart taste of the real lemon and a bit of maple syrup for sweetness. A tiny pinch of salt never hurts either.

Screen Shot 2016-05-26 at 10.55.17 AM.png

Whiskey Ginger from MyDomaine

Recipe for my “Whiskey Sour”:
2 oz whiskey
1 oz lemon juice
1/2 oz maple syrup

// Add ice and above ingredients to a shaker.
Shake for at least 20 seconds then strain into a low-ball glass with ice.

If you’re not feeling whiskey, like me, then here’s a few (two-ingredient!!) cocktails that may float your boat this summer. I’m looking forward to trying a few of them this Memorial Day weekend. Like the red wine/coke combination pictured below. Talk about refreshing. Be safe everyone 😉

Screen Shot 2016-05-26 at 10.53.05 AM.png

Kalimotxo via MyDomaine


Breakfast Taco Tuesday

Remember that time when I went through my ‘sticky rice‘ stage- well now it’s my ‘taco stage.’ I shared my (canned) tuna taco recipe last week and ever since I made the breakfast taco bar for Mother’s Day I’ve been obsessed with breakfast tacos. Particularly of the soft scrambled egg kind. No rubbery eggs in my house!

Not only are egg tacos insanely cheap but they’re crazy versatile. Add any veggies you have in the fridge, or if you’re me and feeling lazy on a Monday night- just add a bit of feta cheese and you’re set.

If I wasn’t so lazy I would have gone with the Greek route and added some oregano and olive tapenade with the feta- next time.

IMG_5748.JPG

Breakfast Tacos (gluten-free)

2 corn tortillas (I buy mine from a local Mexican market)
2 eggs
1 tsp coconut oil
1 tbsp coconut milk (regular milk or almond milk will work too)
salt & pepper
2 tbsp feta cheese

Greek tacos: above recipe + 1 tsp oregano in the eggs & olive tapenade as the “salsa”

// Heat non-stick skillet over medium-low heat with coconut oil.
Scramble the eggs and coconut milk very slowly by constantly moving them around in the pan.
Add salt and pepper halfway through and continue stirring until just set.
Warm the tortillas in a damp towel in the microwave for 20 seconds.
Add eggs and feta cheese to the tortillas and have at it!